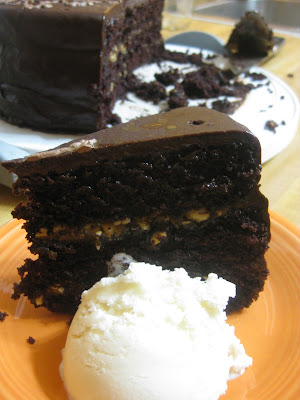
It's been nearly three weeks since I made (and ate) this cake, but I'm still thinking about it. It might be the best cake I've ever made- But I have a tendency to love the cake that I'm with (like that Elvis song, "I love only one girl, the one I've got my arms around").
So here it is, the cake that has captured my heart. For now.
Step 1: Bake 3 cakes.
I used the basic chocolate cupcake recipe from Vegan Cupcakes Take Over the World. Maybe I mismeasured the cocoa in the past or maybe I just don't remember the cupcakes being so darn chocolatey, but this cake is black as night. I used the same cocoa as always, Equal Exchange fair trade cocoa, and didn't even change anything in the recipe.
I recommend adding a layer of waxed paper around the bottom cake layer to protect your cake plate from messy caramel and such. Just remove before serving (duh).
Step 2: Make Peanut Butter Caramel.
This wasn't my idea, it was the kids' idea. I didn't follow a recipe for this, but it turned out fantastic! Here's an approximation of what I did:
In a small saucepan, combine 1/2 cup brown sugar, about 2 Tbsp. agave nectar, 2 Tbsp. Earth Balance margarine and a splash of water (no more than 1/4 cup). There should be just enough water that you can stir everything together. Heat over low-medium heat until the sugar melts and it's boiling vigorously. As it boils, stir nearly continuously and check the texture of the caramel. You could use a candy thermometer to check for the "soft ball" stage, but mine broke, so I relied on looking for "sheeting", the phenomemon when a sugar syrup doesn't drip in individual drops off of a spoon held up high- the drops combine into a flat sheet as they drip. It's just like making jam!
When sheeting happens, it means your sugar syrup/caramel will be thick and gelled when it cools. That's what you want here. If you take it too far (to the hard ball stage), then your caramel will be hard and crackly. Fun on ice cream, but not in the middle of a cake.
Once your caramel is at the sheeting stage, turn off the heat and stir in a good 1/2 cup of natural peanut butter. It'll look something like this.
I want to eat this right now.
Step 3: Assemble the cake.
Your caramel will thicken as it cools, so get your cooled cake layers ready for assembling. And chop some salted peanuts, too.
Pour 1/2 of the pb caramel over one layer. Spread it all over, up to the edges of the cake. Then sprinkled chopped salted peanuts over the whole thing.
Then top with another layer of cake and add more caramel and peanuts. Finish with the last layer on top.
Step 4: Encase it in chocolate.
Ridiculous, right? I can barely stop from getting up right now and baking more of this cake. Let the layers cool completely so that the cake is glued together with caramel and won't budge when you pour tons of ganache over the top.
Step 5: Eat it.
Crazy, crazy good.


5 comments:
omg that looks freakin amazing...but also like it takes a lot of ingrained baking talent, I'd be afraid to try it!
If you can't be
with the cake you love...
Ho-ly SH!T, Liz! Incredible.
Must be the boys' birthday?
Drooooooling...
This looks fabulous, delicious and dangerous. Sign me up!
Post a Comment